
This guide relates only to IPR 3.7.
The Micad Asbestos module for IPR 3.7. This guide is provided for the step-by-step process in capturing asbestos data from the perspective an asbestos survey consultancy.
The Micad IPR, Internet Property Register is a space management system. Micad clients use this system to identify scape records accurately. The majority of Micad’s clients will use CAD floor plans to create space records with dimensional accuracy. The essence is to identify all space (rooms), to never miss a room and to never double count a room. This holistic view on a property portfolio captures all the rooms that need to be surveyed. Therefore, any building with any one single ACM needs all rooms inspecting – and that state needs to recorded Asbestos module to corroborate.
Assumptions:
- Client has a mature and up to date IPR portfolio
- Client facilitates access to the IPR
- Client coordinates asbestos survey works in line with Consultant – And makes no changes to the IPR portfolio without joint agreement.
- Consultancy understand that IPR is the host for an Asbestos register, as well as other professional modules
- Consultancy is trained and can produce a valid Micad training certificate
- Client is responsible for providing and maintaining desktop licenses
User rights, configuration, requirements and best practice
An IPR user account to allow log in – this could be as low as a read only IPR account.
To access the Asbestos module an IPR user account needs to be granted rights specifically via the Asbestos module. The list of IPR users will appear in the Asbestos module, and the Micad client administrator will grant the rights for their survey contractor.
Note: There is no assumption that an IPR administrator is automatic granted any rights within the asbestos module. Ideally, the client IPR administrator will adopt the role as the space manager and the contractor will adopt the role as asbestos manager while performing the site surveys. A best practice scenario is where both parties collaborate, accurate space records form 50% of the survey, they validate the Priority Assessment (12 points from 24). The Material Assessment provides the proof that asbestos is identified, this forms the remaining 50% (12 points from 24). Coordination of survey work vs actual site layout creates quality data. This benefit is the result from working synergy between both parties. Plan surveys and capture change from refurbishment or factual inaccuracies identified on site.
Micad clients rarely manage their own asbestos data, rather they audit the input from the contractor. Micad advise that the asbestos contractors are granted Administrator rights to the asbestos module. Although asbestos module user rights have granular detail control and can be custom defined.
Typically look out for the following configuration that can be applied to the asbestos module.
The Micad client administrator needs to configure the asbestos module ready for use by their Contractors.
These are the features and access levels in the module that require consideration:
- Provide at least one member of the survey team admin rights
- Grant the Contractor’s users access to the appropriate survey locations
- Grant the Contractor user access to the IPR FileStore – to upload photos
- Contractor configures the Asbestos Module with correct lookups / observation defaults
- Enable the Contractor’s users with access to the (optional) MiAsbestos App
- Enable drag and drop asbestos profile tool (optional)
There are two optional data entry features for the Asbestos module, these require optional licence keys available from Micad. The Micad mobile App, Mi Asbestos and the Profile tool.
Find the correct location for your inspection and samples
There are 3 ways to access the exact location to input your asbestos data. Speed of access is important and often the format of location name data can play a big part in aiding productivity. Review the location data an choose the most convenient way that gets you there fastest.
Most Micad clients have CAD drawings, look for these at the floor level. The master floor plan in IPR is marked As-Built. Ask the client to provide access in IPR to review the As-Built floor plans.
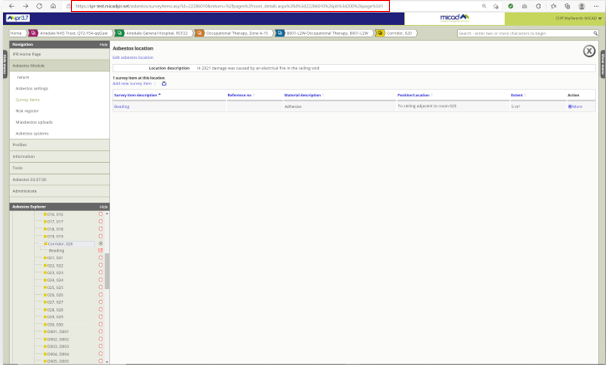
In the following example will be the lifecycle of an ACM. Beading found in Corridor, 020.

We need to get to room ‘Corridor, 020’ on the Airedale NHS estate. To do this you will be using the client’s IPR property portfolio.
Note: IPR always displays two location identifiers, the name and its code. Codes are most likely to be formed of building, floor and room numbers. Codes are not necessarily door numbers, these more likely be number schemes that are aligned with a client’s information systems.
In this order, the quickest access methods are available when working with an established IPR property portfolio. Our clients take care to set up accurate IPR property portfolios. Between clients, there are subtle differences in the schemes used so look for unique location identifiers. Building names help but codes are more use, particularly if unique room number is available. Codes are a great advantage and time saver.
- Search (choose location filter in the search results)
- Navigate the location bread crumb across the top of IPR
- Use IPR Explorer to expand each node
Note: Many clients have unique building identifiers and/or room numbers, using these will save you keyboard time.
Asking for help, working with clients and colleagues - sharing system links
If you work on IPR and the Asbestos Module, you can share the exact property locations and asbestos module pages with colleagues, clients or Micad support. Copy the web browser URL and include this in your communications, when they click the link, they will open the system in the same view.
Copy the browser URL link and add this to your communications. Any recipient will land in exactly the same view as you have on your screen.
Accessing the Asbestos Module
The Asbestos Module is one of many optional modules of IPR. The client or system administrator needs to grant users access to the Asbestos Module before it becomes visible. If you think you should have access but cannot see Asbestos in the left menu, check that you have been specifically granted access to the Asbestos Module.
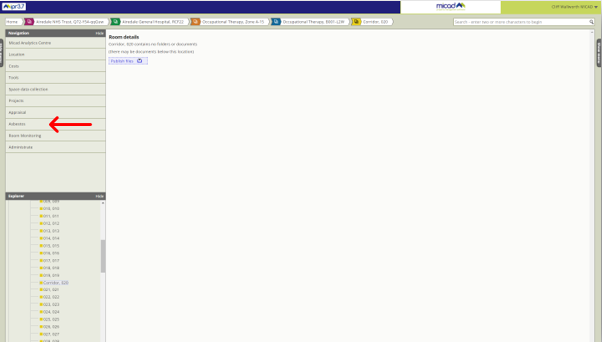
You can access the Asbestos Module on the left menu of IPR it is visible at Site, Block, Floor and Room levels.
I have found my room ‘Corridor, 020’
Note: Indoor assessments for Asbestos Containing Material (ACM) are recorded in IPR in the exact room/space. External items should be recorded at the IPR’s building/block level, this way IPR provides certainty of placement of items on the outside of the building.
Note: Do not be tempted to create rooms or floors in IPR called ‘outside’ or ‘external’.
The Asbestos Module
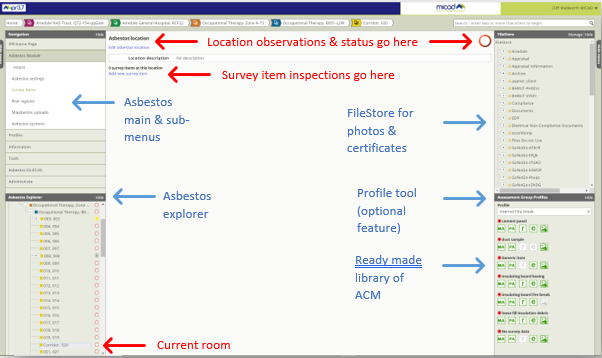
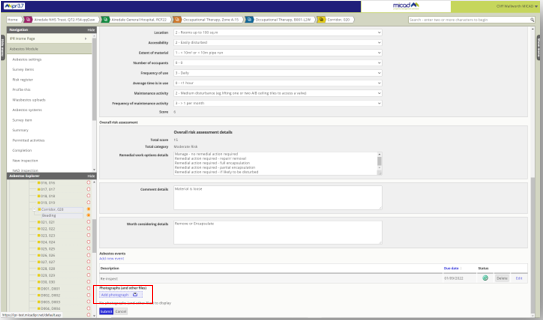
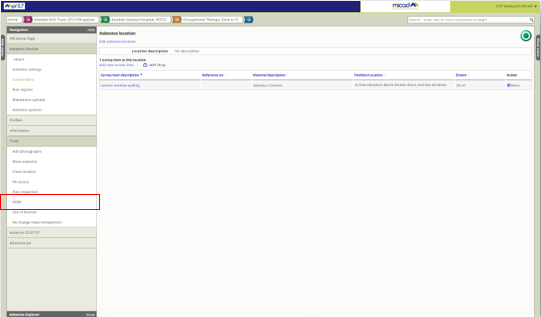
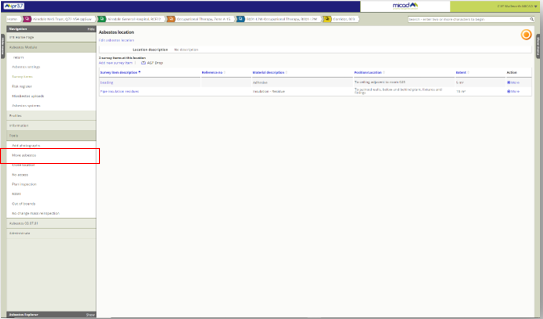
To record your inspections, you need to first create survey items, these are the building fabric and assets you observe as you identify and sample. Photographs taken on site need to be uploaded via FileStore.The Asbestos Module workspace appears in the central article, here is where all your inspections will appear. Around the workspace are the essential productivity tools. You may also appraise the location itself, recording general notes about the fundamental building fabric of the property. We use large location status icons at the top of the workspace to clearly communicate out of bounds or a No Access situation.
On the left is the main Asbestos Module menu, the features that are listed here play their role based on the location level in IPR.
On the right, FileStore is visible so that you may arrange the folders, photos and certificates in a neat and logical order for the client. Our clients use IPR to store and share files for many collaborative purposes, an organised filesystem is essential for the client.
Assessment Group Profiles is an advanced feature unique to Micad Asbestos Register. It’s a library pre-configured inspection for known and common products. With this tool, you set up this library once before you start to record samples, the just drag and drop fully inspected asbestos items. You can set up all your scenarios using Profiles. Adding inspections this way creates a very neat and uniform set of risk assessments and will save you 95% of the keyboard work compared to hand tying each time. Assessment Group Profiles is tool suited best to new clients, fresh starts or for converting legacy records rapidly to IPR’s space validated property portfolio.
Making an inspection
Use IPR’s property portfolio to record the correct location for your ACM. Placing indoor items in the corresponding room seems quite obvious but there are external building fabrics that to be considered as well. To accommodate these varied scenarios, follow this rule of thumb.
Each ACM inspected has its place within the IPR property schema:
Indoor items – these are recorded in IPR’s rooms (stair nosing, cisterns, ceiling tiles etc.)
Outdoor items – these are recorded in IPR’s Building level (Roof tiles, DPC, soil pipe etc.)
Note: It is possible to record items at floor level, though these circumstances are uncommon. Perhaps, rope seal around a whole concrete floor. AIB shuttering above a whole floor in a ceiling void.
To build a clear unambiguous picture, you should consider where the risk for human contact really fits in rather than thinking directly about the physical shape or material of an ACM. Ask yourself how contamination many manifest itself and what would you need to reference a location to warn people. A common ceiling void above a whole floor can be recorded as ‘Void above suspended ceiling’ as one item in any room under this ceiling. You then simply copy the full item and inspection to all the remaining rooms.
Creating the first inspection
The example shows the asbestos workspace empty, there’s no asbestos data here at all. Note the Asbestos Module displays a red ring  in the top right corner. This is the default status for an Un-surveyed location. The location is currently unqualified until you commence the addition of items you pickup during your inspections. Risk scores from your inspection influence this status to favour worst-case scenario for the room (highest scoring item).
Note: An Unsurveyed state is not a qualification of assessment, it is a fail state by way of omission.
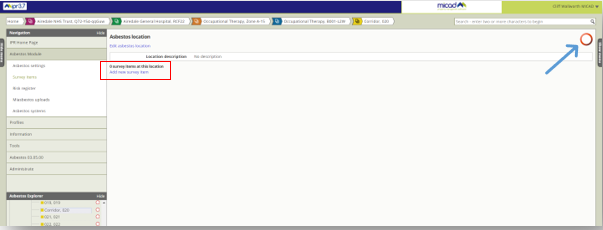
Click Add new survey item
We will add a suspended ceiling Beading to Corridor 020.
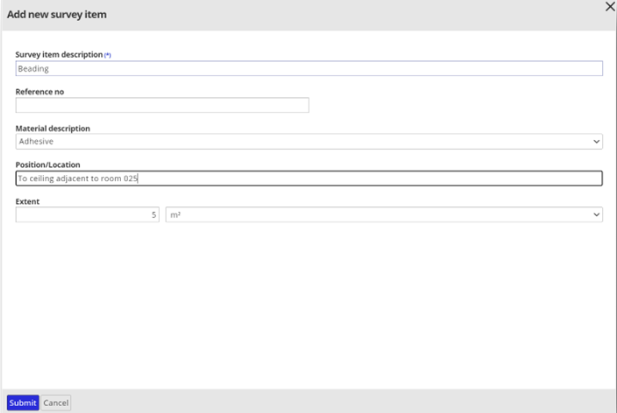
Fill out the details for the item to be inspected. Provide sufficient information to describe the item and where it can be found. Click Submit.
Your survey item now shows in the Asbestos Module workspace and the Asbestos Explorer. If you prefer you can repeat the process and add all the items first before inspecting.
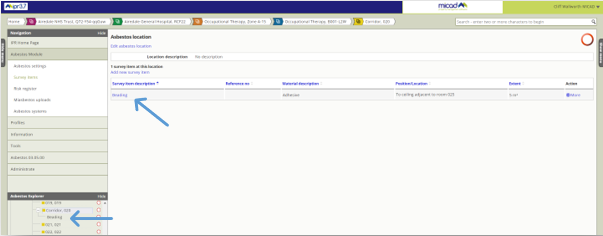
You are now ready to inspect your item.
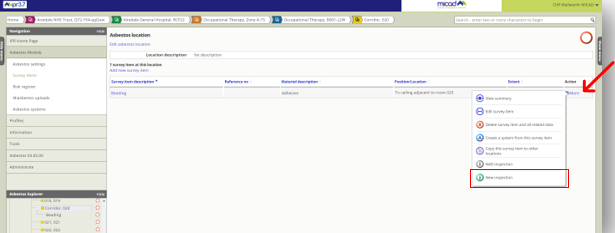
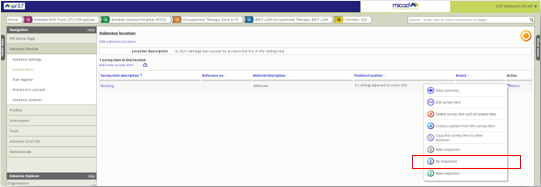
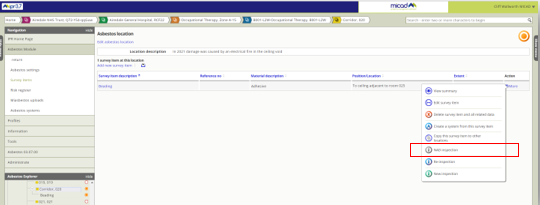
You can click on the item itself and progress through or use the direct-Action menu.
Click on the More link to open the Actions menu.
Select New inspection
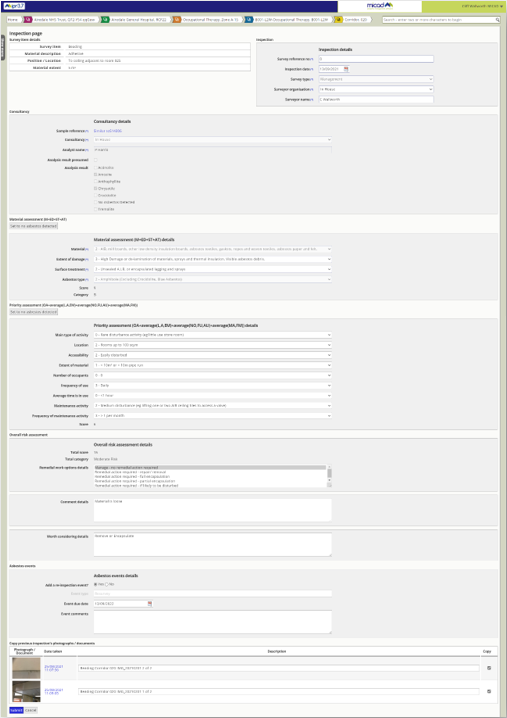
Fill out the inspection form carefully and click Submit.
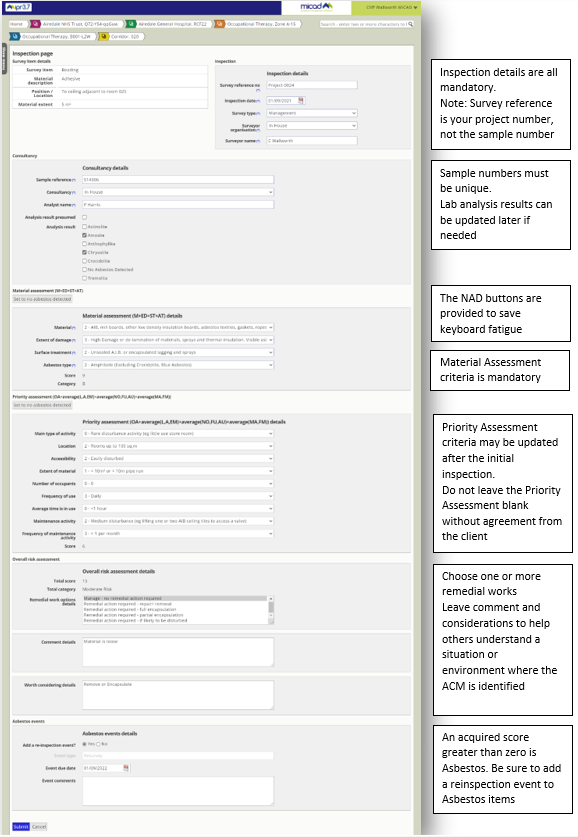
The inspection is recorded, now add your photos. There are 2 photos to add for this inspection.
At the bottom of the inspection form you can see the Add photographs dropzone.
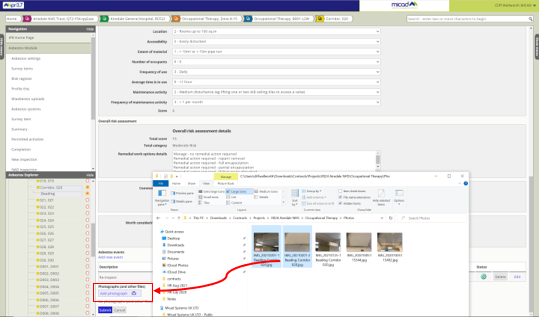
Open Windows Explorer showing your camera library thumbnails, drag both onto the blue dropzone
Release the mouse over the dropzone and IPR FileStore will begin the publish process
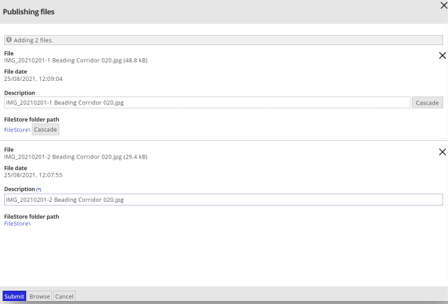
We want to promote best practice for our clients, organised folders and well named document descriptions is a certain endearing accolade to claim in this relationship.
Here’s your best chance to describe the files rather than touching up each asbestos inspection later. Most importantly, set the files to upload directly to the correct place. Aim to store the files responsibly in line with folder names that are agreed with the client.
Note: Do not just drop the files on the root folder, and do not leave photos described as camera roll numbers
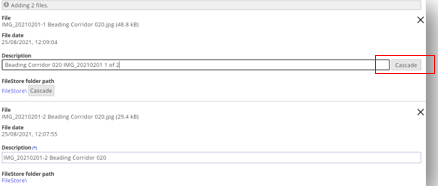
The Cascade buttons on the first file are here to help save keyboard fatigue, fill out the description, then click Cascade, the copied descriptive content can then be touched with up minor differences.
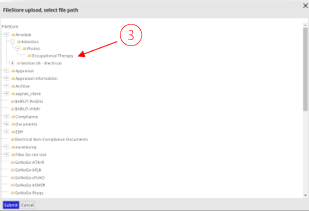
By detailing the first file description and picking its correct folder on FileStore, the data set out ready to be uploaded to Asbestos Module.
Here’s how it’s done. Use the Cascade buttons to update all rows
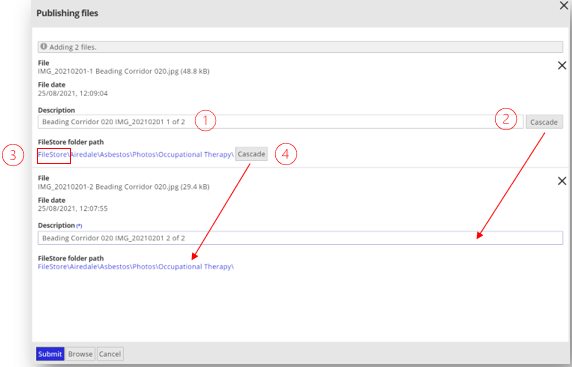
- Type your master Description
- Cascade and touch up the differences if there are any
- Set the correct photos folder (Blue folder path FileStore link - choose the upload folder)
- Cascade the FileStore folder path
Press submit to upload the photos and commit the descriptions to the inspection data.
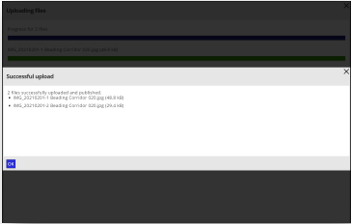
Confirmation will be briefly visible, number of files and two progress bars. The top (blue) progress bar is the overall transfer, then for each individual file (green).
Once the upload is succeeded, click ok.
Here’s the result of your work. Photos are attached to the foot of inspection form. If you expand the right menu, you will see FileStore has the photo uploads correctly placed in the appropriate folders. If you prefer, you can you drag existing files from FileStore onto the inspection form dropzone.
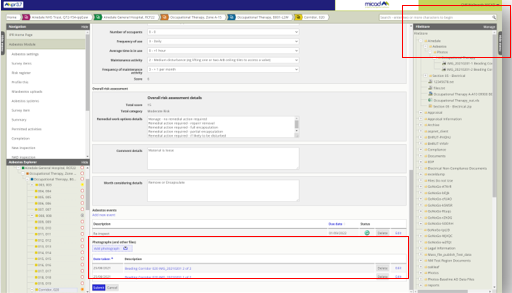
Click submit at the bottom of the inspection form under the photos
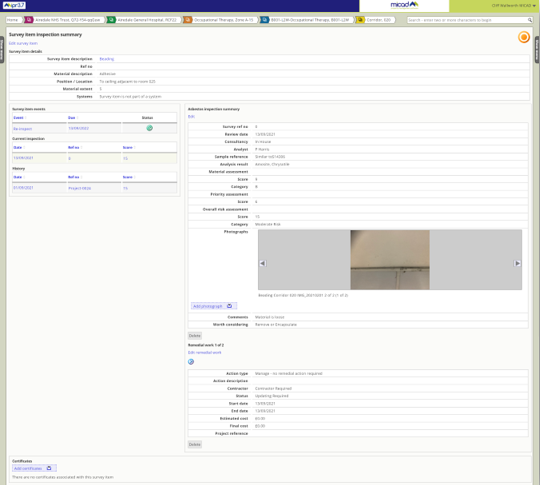
The identification of our Beading ACM and its first inspection is now complete. You are now returned to the survey item inspection summary. Here you can set further detail the about the item itself.
The summary page plays an important role, it encapsulates the survey item and its full life cycle. It allows us to set status for the item, set diarised events, perform re-inspections and hold documents that relate at any time throughout its term of management.
In the central workspace we have the item details, inspection summary, our diary event in one year’s time and a clear view on the current inspection date. The two photos for this inspection appear in a carousel. Any further information needed can be added from central feature. The left menu actions are aligned now to the life cycle processes of maintenance.
No Access (item) status
Note: We have two states for no Access. Inaccessible item and inaccessible location, they are not the same. Asbestos module supports both scenarios, and they can also be both used together.
In a hypothetical situation, our Beading item may need to be marked inaccessible since the surveyors don’t have high access equipment.
To apply a No Access state to the Beading, click the item name on the summary, choose the no access reason and click submit. This confirms that beading (item) could not be accessed during the survey.
No Access (location) status
As you enter the Asbestos Module at any given location you can see at the top of the workspace, the Edit asbestos location link.
Click the Edit asbestos location link to set the status to Corridor, 020. This state would be applied if the surveyor could not get access to the room itself.
In a hypothetical situation, there was some fire damage to Corridor, 020. We can use the location status and description to create a clear picture of the site during its assessment.

Note: No Access reasons support the status situation, as an administrator of the Asbestos Module it is possible to configure and create your own no access reasons.
Additional location status
Status provides an unambiguous story. We can use all the status available to communicate the issues related to asbestos being in this location and our intentions manage. A no access state can be used in conjunction with other participating messages.
Out of bounds
This is helpful for those clients that really need to send the strongest message. Perhaps a closure of a room or collection of areas is best message for an unambiguous communication. This status is often used in vacated property and pre-demolition
Plan to inspect
This status really exists to aid desktop assessments, this can be set by the client and used to coordinate intentions.
Re-inspections
In the next scenario, it’s been 12 months since our beading was identified and inspected. Now it’s time to re-inspect.
Re-inspection is straightforward, it’s also a low labour process. You can rollover last year’s survey and detail any differences. You can change the environmental assessment scores and choose to add additional photos if there’s a need to do so. You cannot alter the asbestos lab results.
Note: Re-inspection is part of the ACM lifecycle management. Please do not edit a master inspection date, add a second item in the hope that this process simulates asbestos management. These concepts have been witnessed and are wrongfully attempted through lack of familiarity with systems capable of maintaining full lifecycle data.
Let’s return to location in IPR and access the asbestos module from the left menu. Now let’s assume the surveyor can access the item and area so will release the 3 status and update the location notes.
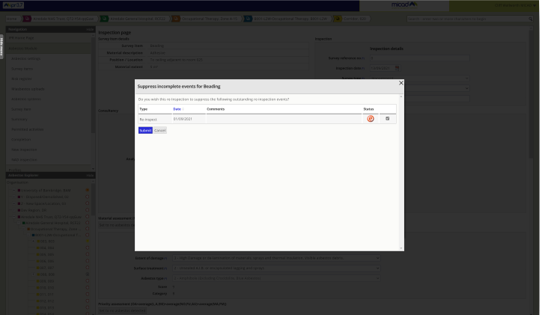
From the Action column click on More. In the context menu, choose Re-inspect.
Before this new re-inspection we should supress any related scheduled events that were added as reminders. A popover window will prompt you to suppress, click submit.
Note: Asbestos Register will check the current inspection for any open diarised events. It is best practice to tidy any reminders as you go.
The Re-inspection form is fully loaded with the original survey data, you can detail any differences if required. Default assumptions air on the side of caution, original photos are linked through again. A further re-inspection event is defaulted to 12 months from today. Check this thoroughly. Click submit
The Beading ACM is developing a clear lifecycle story. The summary page displays the primary detail of its history, levels of risk and future maintenance.
I’ve added a remedial work action, manage and maintain. I can return to this current inspection and add further information by clicking edit. I chose to add an additional action, to fully encapsulate.
A stack of inspections will potentially build up on the left, the current inspection will always be the top of the list, and this is the current reported state. Under the history the list will building chronological order from top down.
Removal process
The current reported state of an ACM (Asbestos containing materials always acquire risk score greater than zero). The system recognises positive scores as positive ACMs and this includes any form of assumptions, a positive score is regarded as asbestos.
A zero score is therefore a non-asbestos sample result, we call this a NAD (No Asbestos Detected). We use a NAD inspection to finalise the story of our ACM. In the asbestos register we call this the completion process. This ends the ACM lifecycle and at that point the item is regarded as removed.
To remove the ACM, we need a final zero score inspection on the Beading item. There is a built-in feature to speed up this process. From the Action menu choose NAD Inspection.
The NAD inspection is effectively a full re-inspection but with all the key zero scores pre-set for you, so the process is just the same.
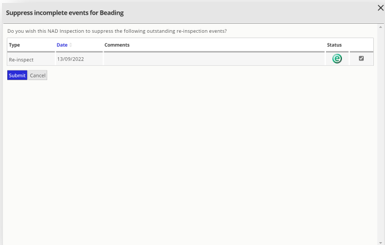
Suppress any outstanding events. Press submit
All of the asbestos assessments do not need to be shown since they will be set to zero.
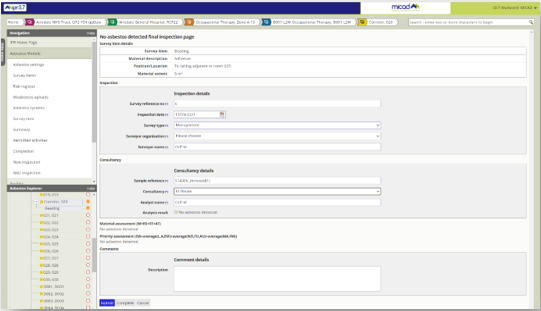
Carefully observe and fill out mandatory fields. Press Submit

The Beading has moved from 15 (orange icon) to zero (grey X icon) – so it is now NAD
We call the removal process “completion”. This is because there are obligations to terminate diary events and to sign-off with authenticity. Succeeding the Completion process results in the item being listed as Removed.
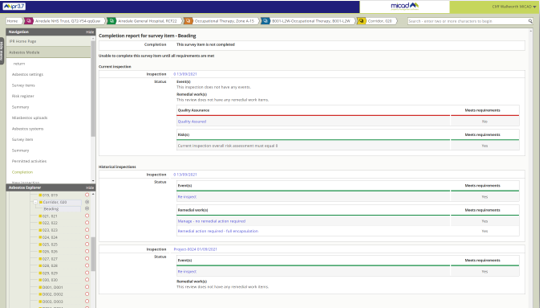
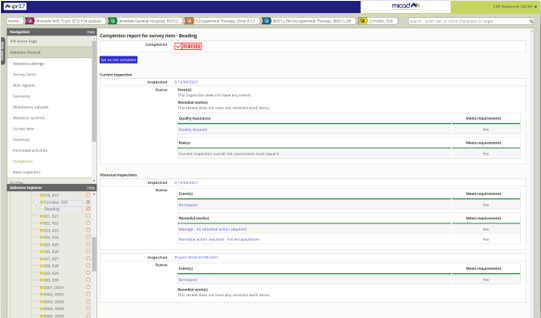
You can access the completion process from the left menu of the summary page. Click on Completion
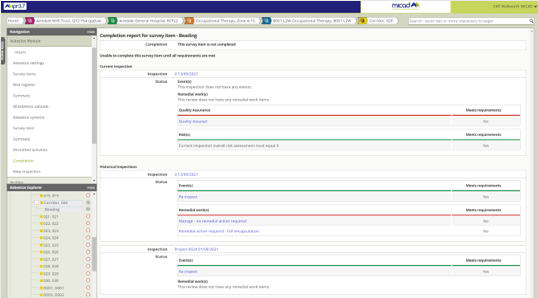
For each inspection, you will see events and remedial work. Both are works set as diary events to close off. The final approval sign off is called Quality Assurance. Look for the No status underscored in red. These are the items that need completing. From the bottom upwards worth through the outstanding items.
Note: Some clients manage their asbestos works fully using the asbestos register. They may commit detailed project information including costs in the remedial works section. Check with the client if you have any obligations to supply any data here if are uncertain. If not, you need only set the Status.
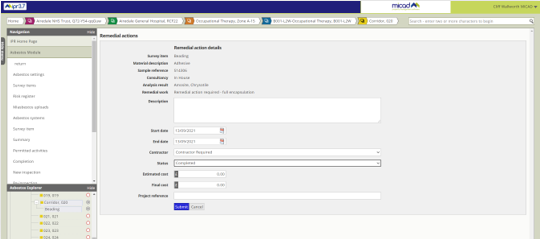
To close this outstanding remedial works, set the status to completed and press submit. Then on the left menu select Completion. Repeat this for rest of the open remedial works and events
Now to complete the sign off, click on Quality Assured link
The QA process will accept your approval. The sign off process cannot be accidentally set by mistake using the sign off process. It is important that the database records the sign off for governance and accountability purposes.
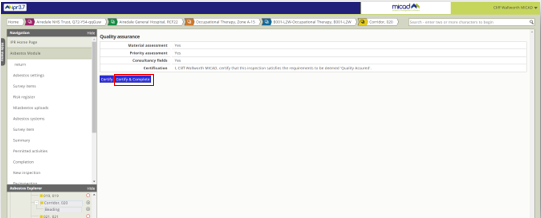
Click Certify & Complete
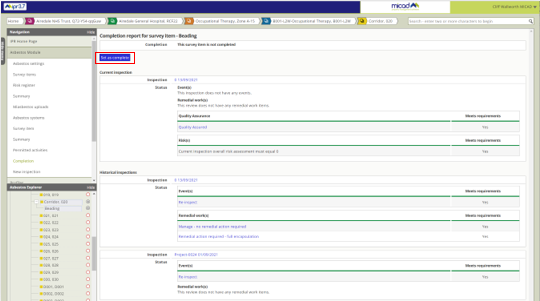
Now everything is summarised showing all outstanding works and events are settled, click Set as complete.
A removed item uses the red tick in the removed stamp. It can be observed in the Asbestos Explorer and Risk register as just a red tick in a red square.
Our Beading is now marked shows the Removed status.
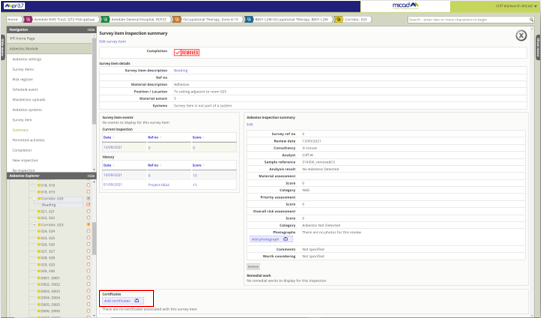
If you have a removal certificate upload this as a PDF, drag the file onto the Add certificates dropzone.
To return and check the life cycle integrity of a once present ACM, everything remains accountable listed under the original survey item.
The Beading example closes off the straightforward lifecycle of a single ACM. But there are other circumstances that may need to be considered to accommodate the materials identified on site.
Copy an item to another location
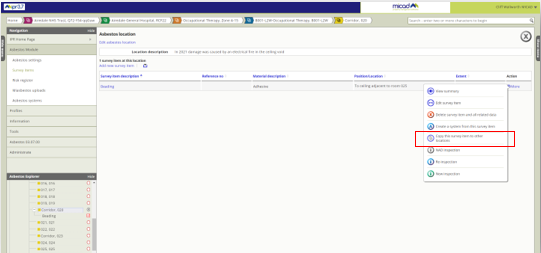
An example of an item copy might be, an adjacent corridor, 023 is clearly using the same ceiling materials. We can copy this master sample and inspection data extrapolating the lab sample number ‘As’ a referenced sample.
From the room with the master inspection (Corridor, 020), use the Actions menu and choose Copy this survey item to another location.
Observe the copy options first. Be sure to set the target location first before checking any item detail options. Click the link, Up a level.
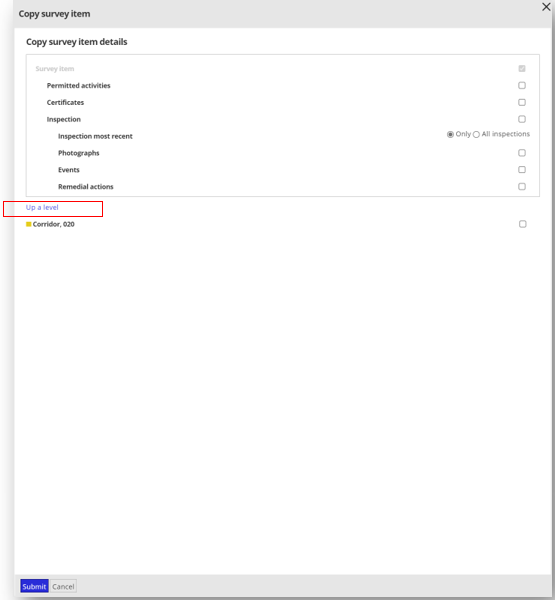
We are copying an item from a room, this is your origin point. To see the rest of the rooms, you need to view one level up, the floor level. This will show all of the rooms on this floor. You could drive back up the location tree, to a site level and choose a separate building if the circumstances required.
You can also choose to copy to more than one location at any one level at a time
Note: switching between locations after having made selections, clears the selections.
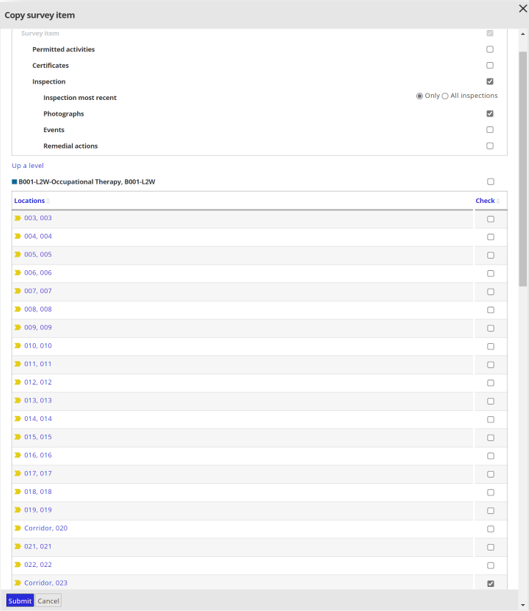
In this situation I want the master inspection since it’s the same lab result. The photos are almost identical for the ceiling tile beading so these can be copied too. I intend to re-inspect them individually in future I don’t want to duplicate inspection history.
Review the copy details carefully and make your selection after the target locations are selected. Click submit. The item is now copied, to target locations. For each copy the original sample number will become prefixed with a refence, ‘Similar to’ or ‘As’. These prefixes can be defined by your system administrator if you have a particular prefix preference.
Delete a survey item
To delete a survey item, use the Action menu and select Delete survey item and its related data. This action is permanent.
Note the descriptive emphasis on the deletion action. Asbestos items can be deleted, scenarios could include total refurbishment where no full record of the item exists after change or where there has been a data entry error. We exaggerate the irreversible nature of deletion here in favour of data integrity here for this reason.
Generally asbestos can be managed out via normal lifecycle change or moved between rooms if there’s been a recognisable accountability and simple layout changes. Of course, an item can be totally deleted if there were some input error during the data entry process too.
Let’s assume this item needs deleting
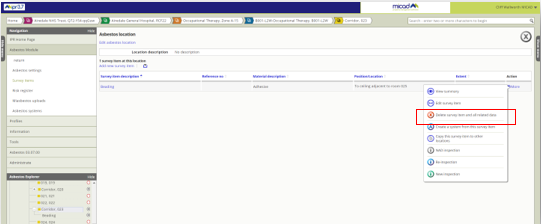
Using the Action menu choose Delete survey item and its related data.
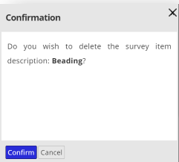
Click on Confirm to proceed with the deletion.
Exception based surveys vs full space records
Asbestos surveys are fundamentally exception-based assessments when paired with space management. When ACMs are found the are then reported with a location, in this order. Traditionally, on paper the survey findings are a report focussing on items inspected and sampled. ACMs and suspect materials are given a verbose situational narrative to identify the actual location on site. So, in terms of inspected locations, no real or full itinerary for every space is ever produced. Verbal caveats are used to assurance full survey coverage. Typically, these include the survey scope and best endeavours to access, inspect all areas, internal and external.
A ‘no access list’ may include some of the remaining (specifically areas) rooms. But this is does not build the full spatial itinerary for the whole building. Clients really need confirmation that all rooms that were inspected even when nothing was found. For this, the Micad Asbestos module uses a status we call ‘No suspect materials identified’ (NSMI)
The client has provided the full IPR property portfolio, so we have a simple tool to fill all remaining locations quickly in one pass once the ACMs are entered (Mass application for Building externals, floors & rooms).
No suspect materials identified, (NSMI)
The NSMI tool to leaves a clear understanding of areas accessed and surveyed. The tool is designed to require minimum to fill the gaps between data entered for ACMs, NADs and No Access works.
Let us imagine a situation where all data input work is now complete for a whole building. All ACMs have been recorded around the building. Before we leave this data and move on to another building, fill the whole building with the NSMI state. Do this so that the client can see the survey was undertaken in every location. From the left menu click Tools (closed the Asbestos Explorer to reveal the full menu), click on NSMI.
The No suspect materials identified (NSMI) tool will fill all remaining locations with the status. In this example the whole building will be complete in as little as 3 mouse clicks.
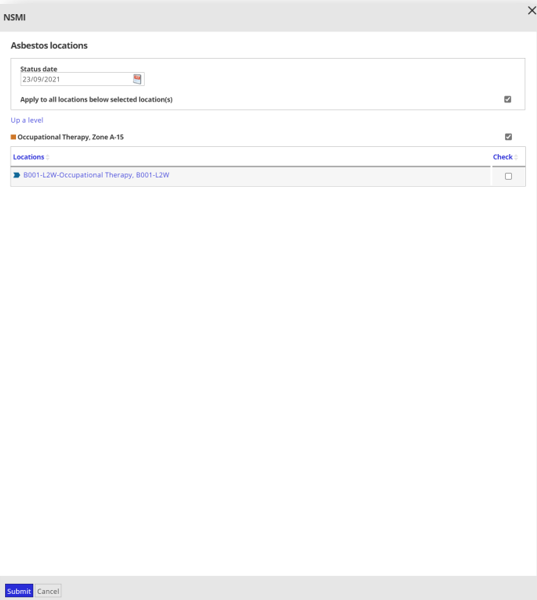
Select the date that the site was inspected, check Apply to all locations below and check the top level from where the status will filter down from. Click submit. You may repeatedly apply by floor if you choose. Once complete, click cancel.
The NSMI status tool flood fills data, but it will not produce contradictory states where ACM and NADs are already recorded. You do not need to check each individual location by hand or pick out rooms with no data, just select the parent level. You may also choose to NSMI in batches, in a large property this might work best on a floor-by-floor basis.
Checking your work – best practice
Use the Risk register at building level to review your work. NSMI is shown on the right (green glasses).
Check your data meets the requirements, scan down the right most column, here’s what to look for:
- Are all ACMs in the correct place? Solid colours are Asbestos, grey are NAD. Use the item counts to check all your samples are recorded
- Fill all remaining locations with NSMI. Green circle with glasses.Missing and NSMI fails the building’s compliance tests. Empty red circles are locations you have missed – there should be none of these visible.
- A No Access icon alone does not meet the building compliance requirements. Red padlock
Add a presumed item to accompany the No Access location – don’t forget to include a reinspection date so that further attempts to access are continued
Asbestos module productivity tools
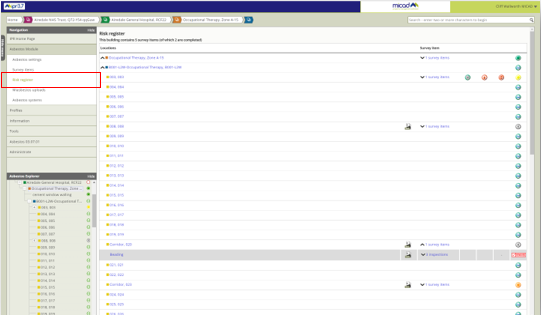
For a client with established IPR portfolio and mature Asbestos Module data, the best way to review and navigate their data is using the Risk register.
Use the Risk register to review your client’s data. This feature will be your first choice for data overview, you can access this from the left menu at site level and below. You can drive through the data by expanding each location level.
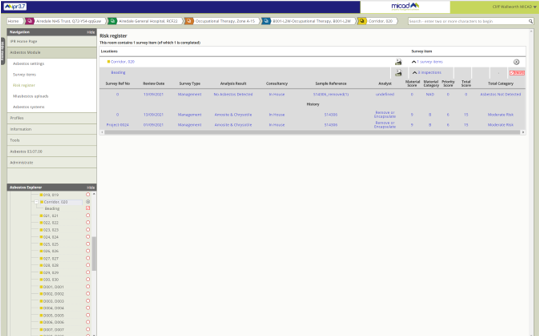
Risk register
The Risk register provides a quick insight on surveyed items, it offers a high-level view showing location status, item status and item counts. With a further click you drill down directly into the item and its complete history.
During your review you will navigate and see risk and status icons to the right. These form a uniform and unambiguous appraisal of the location state. Look for Un-surveyed, NSMI, No Access, plan an inspection & Out of bounds – these are location status. Click further to get to item counts within each location we aggregate location risk using a ‘worst case’ basis, the item with the maximum score forms this worst case location state.
Asbestos Statistics
This asbestos management console is primarily designed for the Client to review building compliance from one vantage point. For each building, any given issue can be targeted directly from the charts. These charts provide the board level essentials performance measurements and statutory compliance.
Access the asbestos management console from the left menu of IPR at site level.
Click on the chart segments for Survey items, No access locations, and No access items to get a report or schedule of items. Pay attention to the Actions console at the bottom of the page, it is drawing your attention to buildings with current issues that are causing one or more failure in compliance.
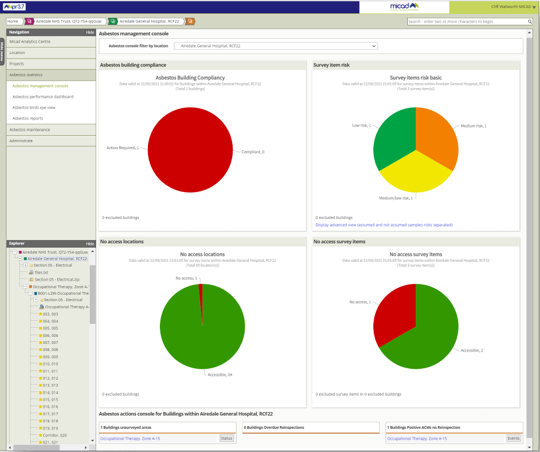
Use the 3 Action lists to get straight at the unresolved compliance issues. Keep these lists empty!
Un-surveyed areas building areas – Something has been missed or new space records are unqualified by assessments or NSMI status
Overdue re-inspections – a positive ACM has a diarised survey event that has gone overdue
Positive ACMs with no re-inspections – a positive ACM is recorded but has no diary event for re-inspection.
Drawings and asbestos risk graphic reports
If the client has as-built floor plans these can become really helpful in identifying location details. And they can be used as report to check everywhere has been checked. The asbestos legend can be added to understand the risk levels for each room.
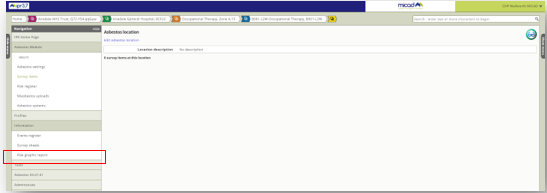
From the Asbestos module left menu – at floor level, click on Information, Risk graphic report.
You can use the CAD drawings to assist with identifying the locations on site. Zoom right in on structural detail and the fine text for room numbers. The mouse wheel and left click provides pan and zoom.
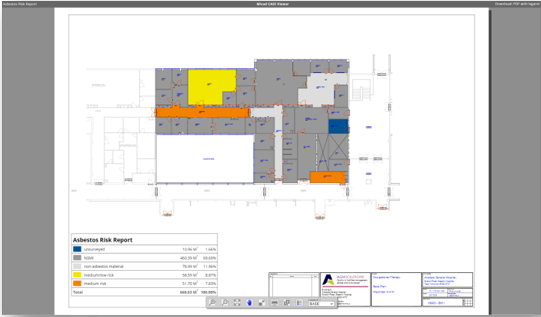
Add the legend and set up great management reports. You can capture these drawings by downloading the PDF from the top right of the CADi Viewer. These images could be added to your own UKAS reports too.
IPR and asbestos module situational 360 photos
If you have access to a 360 camera, take some photos of the areas you inspect. IPR 3.7 and its new asbestos module can provide an immersive experience which produces a completely unambiguous understanding of the environment and the placement of the survey findings. The 360 galleries can be created back at the office inside IPR, they are easy to compile once all the inspections are recorded in the Asbestos module.
A great 360 example works well for complex equipment dominated areas such as plant rooms or roof voids and infrequently accessible areas.
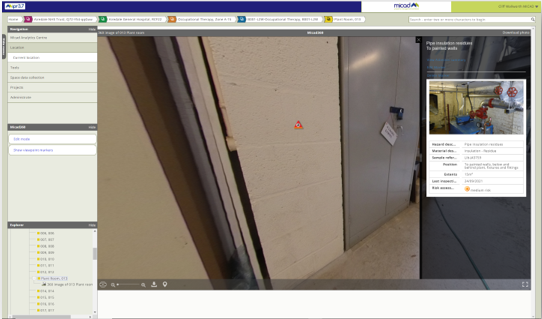
When you upload a 360 photo to room in IPR, if that room has asbestos items recorded the 360 viewer allows you to drag asbestos (triangular warning) markers onto the 360-orbiting photo. The markers are interactive and ideal for users browsing as they pan around the image.
See the IPR user guide documentation – its available from the About link under your IPR login (top right of the screen)
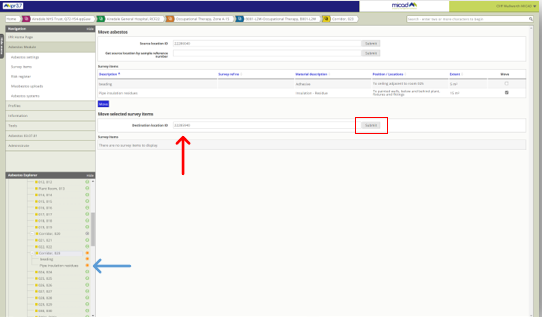
Maintenance - Move an asbestos item
On the odd occasion you may need to move an item. Circumstances where the needs arise are, post refurbishment, non-fixed assets such as ovens or kilns that move between rooms and data entry error.
Move Asbestos is an Asbestos Administrator’s feature. This link will not appear for users without this permission.
In this scenario the Pipe insulation has been entered into the wrong room, it should have been added to Plant room, 013. Before you start the move process, identify the correct room.
From the source location open the Tools menu and click Move asbestos

You can open a second browser window and navigate IPR and set yourself within the correct location. From the URL copy the location ID to the clipboard.
The location is the numbers always ending with zero, displayed after the word details…
pages/room_details.aspx?id=22285940&pb=200&page=1
Copy this number
Paste the copied number into the destination location ID box and click submit.
Then click on Move
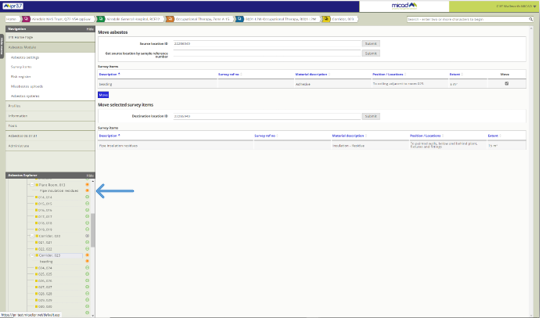
Success, the Pipe insulation has now moved to the Plant room, 013 with all of its data intact. You can continue with further items if needed. To exit the Move feature, click Survey items on the left menu.
Comments
0 comments
Please sign in to leave a comment.